Friday 9 February 2018

Salesforce to Salesforce Integration using PartnerSoap API


If any one new to Webservices, this blog post will help you to get webservices experience. 
It's very easy to integrate with another salesforce instance using SOAP API. Just follow below steps.

Requirement:-
We have 2 Salesforce instances, Salesforce A And Salesforce B.
Share(create) a Account record from Salesforce A to Salesforce B using Share button on Account record in Salesforce A instance.

Step 1: Generate Partner WSDL in Salesforce B instance.


Step 2: Save the generated Partner WSDL in your local system.


Step 3: Generate Apex code using the generated Partner WSDL in Salesforce A instance.


It results in generation of four classes.
1)sobjectPartnerSoapSforceCom
2)faultPartnerSoapSforceCom
3)partnerSoapSforceCom
4)AsyncPartnerSoapSforceCom

Step 4: Creating a custom button in Account in Salesforce A instance.

Button Code:

{!REQUIRESCRIPT("/soap/ajax/25.0/connection.js")} 
{!REQUIRESCRIPT("/soap/ajax/25.0/apex.js")} 

var agree = confirm("Are you sure you want to share?"); 
if(agree){ 
sforce.apex.execute("SharewithCricket","share",{localId:"{!Account.Id}"}); 
alert("shared"); 

else{ 
alert("not shared"); 
}

Step 5: Add the custom button to Account page layout.

Step 6: Create SharewithCricket apex class, which is calling from button. 

global class SharewithCricket
{
    webservice static void share(Id localId)
    {   
    
        String username = 'username;
        String password = 'passwd+security token';
        
        List<Account> acct = new List<Account>();
        String sql = 'SELECT Name,Phone,Type,Industry,AccountNumber,Description,FAX,SLA__c,Rating FROM Account WHERE ID=:localId';
        acct = Database.Query(sql);
        
        partnerSoapSforceCom.Soap con = new partnerSoapSforceCom.Soap();
              
        partnerSoapSforceCom.LoginResult loginResult = con.login(username, password);    
        
        con.SessionHeader = new partnerSoapSforceCom.SessionHeader_element();
        con.endpoint_x =loginResult.ServerUrl;
        con.Sessionheader.sessionid = loginResult.sessionid;
        
        List<sobjectPartnerSoapSforceCom.sObject_x> sObjects = new List<sobjectPartnerSoapSforceCom.sObject_x>();           
        sobjectPartnerSoapSforceCom.sObject_x tmpObj = new sobjectPartnerSoapSforceCom.sObject_x();
        for(Account ac:acct)
        {
            tmpObj.type_x = 'Account';
            tmpObj.AcctName = ac.Name;
            tmpObj.Phone = ac.Phone;            
            tmpObj.AcctType = ac.Type;
            tmpObj.AcctIndustry = ac.Industry;
            tmpObj.AcctNum = ac.AccountNumber;
            tmpObj.AcctDesc= ac.Description;             
            tmpObj.AcctFAX = ac.FAX;
            tmpObj.AcctSLA = ac.SLA__c;    
            tmpObj.AcctRating = ac.Rating;    
            tmpObj.Acctactive='Yes';
            sObjects.add(tmpObj);
        }
        con.create(sObjects);           
    }
}

Note: Don't forgot to add Salesforce B instance credentials - username and passwd+security token in above code.


Step 6: Add the field details in sobjectPartnerSoapSforceCom apex class.

public String AcctName; 
private String[] AcctName_type_info = new String[]{'Name','urn:partner.soap.sforce.com','string','1','1','true'};      

public String Phone;
private String[] Phone_type_info = new String[]{'Phone','urn:partner.soap.sforce.com','string','1','1','true'};       

public String AcctType;
private String[] AcctType_type_info = new String[]{'Type','urn:partner.soap.sforce.com','string','1','1','true'};      

public String AcctIndustry;
private String[] AcctIndustry_type_info = new String[]{'Industry','urn:partner.soap.sforce.com','string','1','1','true'};       

public String AcctNum;
private String[] AcctNum_type_info = new String[]{'AccountNumber','urn:partner.soap.sforce.com','string','1','1','true'};        

public String AcctDesc;
private String[] AcctDesc_type_info = new String[]{'Description','urn:partner.soap.sforce.com','string','1','1','true'};       

public String AcctFax;
private String[] AcctFax_type_info = new String[]{'Fax','urn:partner.soap.sforce.com','string','1','1','true'};       

public String AcctSLA;
private String[] AcctSLA_type_info = new String[]{'SLA__c','urn:partner.soap.sforce.com','string','1','1','true'};        

public String AcctRating;
private String[] AcctRating_type_info = new String[]{'Rating','urn:partner.soap.sforce.com','string','1','1','true'};

public String Acctactive;       
private String[] Acctactive_type_info = new String[]{'Active__c','urn:partner.soap.sforce.com','string','1','1','true'};

//End

Note: Edit the private String[] field_order_type_info = new String[]{'type_x','fieldsToNull','Id'}; 
To
private String[] field_order_type_info = new String[]{'type_x','fieldsToNull','Id','AcctName','Phone','AcctIndustry','AcctType','AcctNum','AcctDesc','AcctFax','AcctSLA','AcctRating'};

Step 7: Edit partnerSoapSforceCom class, update endpoint_x in Soap inner class with your Salesforce B instance URL.


public String endpoint_x = 'https://ap1.salesforce.com/services/Soap/u/41.0';


Step 8: Adding Remote site settings. 
Add Salesforce B instance URL in Remote site settings.


OUTPUT


Now you can see the Records created in Salesforce B instance.


Salesforce Data Loader


Salesforce Data Loader

– What is Salesforce Data Loader data loader? and why we use data loader?
– Salesforce Data Loader is a tool provided by sales force to perform following opearation on data.
– By using Salesforce data loader you can load up to 5,00,000 records.
– Salesforce data loader good tool to load bulk amount of data into your Sobjects.
– By using Salesforce data loader you can schedule the loads.
Insert, Update, Upsert, Delete, Hard delete, Export, Export All
– When importing data, Data Loader reads, extracts, and loads data from comma separated values(CSV) files or from databasa conections. When exporting data, it outputs CSV files.
We can use data loader in following 2 ways.
User Interface
Command Line
Key features of the data loader
– An easy-to-use wizard interface for interactive use
– An alternate command line interface for automated batch operations
– Support for large files with up to 5 million records
– Drag-and-drop field mapping
–  Support for all objects, including custom objects
– Can be used to process data in both Salesforce and Database.com
– Detailed success and error log files in CSV format
– A built-in CSV file viewer
– Support for Windows 7

Import Wizard vs  Salesforce Data Loader Data Loader

Use the Salesforce Data Loader Data Loader when
– To load the data greater than 50,000 we will go for data loader. We can load up to 5,00,000 records at a time by using data loader.
– To load the data into an object that is not supported by the import wizards.
– To schedule regular data loads, such as nightly imports.
– To export data for backup purposes.
Use the import Wizard when
– By using import wizard we can load below 50,000 records.
– The object you need to import is supported by import wizard. Go to setup -> Data management here you can find what are all the objects supported through import wizards.
– You want to prevent duplicates by uploading records according to account name and site, contact email address, or lead email address you can use import wizard.
Installing Data Loader
1. Log in to your salesforce application.
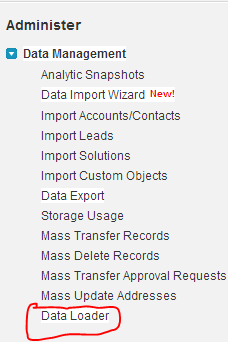
2. Go to setup-> Data management ->data loader
see the following image for reference
Salesforce Dataloader
Once you clicked on data loader you will navigate to another screen there you can download data loader.
3. Install that downloaded file in your machine.
4. To start data loader double click on short cut on your desktop or go to Start > all programs >saledforce.com>Apex data loader>Apex Data loader.
Following is look and feel of data loader.
Salesforce Data Loader
 To log in to data loader click on any operation and provide your log in credentials. If you are log in to Production please provide “Password+security token” in password field.
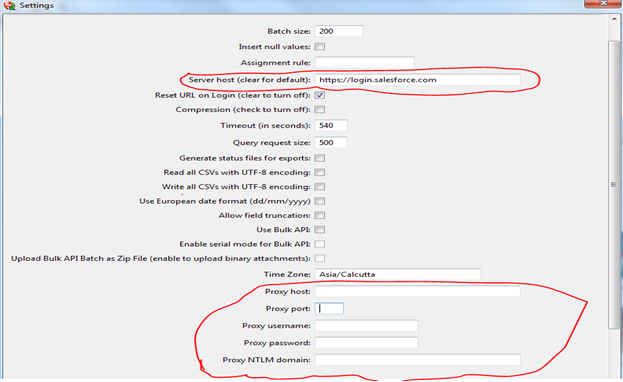
Before log in to data loader please change settings. Go to settings and provide server host url.
If you are working under proxy settings please provide proxy details.
Salesforce data loader
Salesforce Data Loader Operations
Inserting records:
To insert records into Salesforce click on insert button and login with your credentials, during login provide “your org password + security token”.
Click on NEXT and select the object you want to insert the records and choose the .csv file you want upload.
Note: Data loader allow only .csv files.
Salesforce data loader
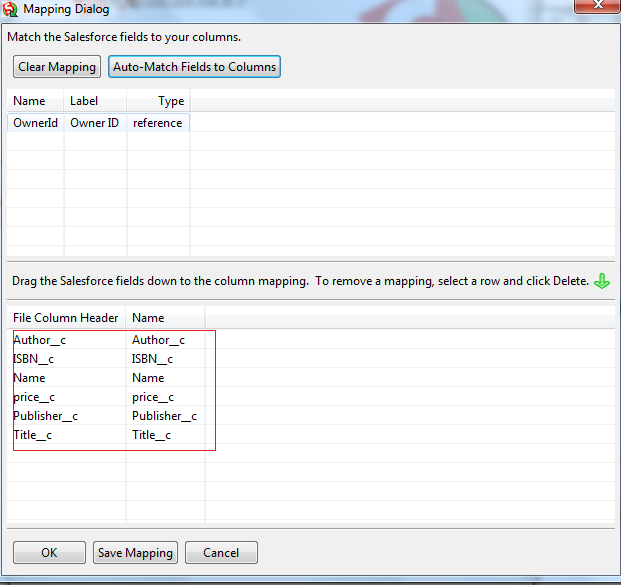
                   Map the fields by using drag and drop.
Salesforce dataloader
Click on ok or save the mapping if need in future.
Click on NEXT and then click on Finish. After inserting records it will display error files and success files.
Update:
To update the records click on update and login.
Next select the csv file contains updated records with IDs and sect the object and complete the operation.
Upsert:
Upsert also same as update but here we can insert new records also.
By using this operation we can insert new records and update existing new records.
Export:
Export means down loading the data from organization
– Click on export button and then login with your credentials.
– Select the object you want to export data and specify the folder where you want to  save this exported file.
– And then finish the operation
Export All: “Export All” means it will give the data including data in recycle bin.
Delete:
Delete means it will delete data from your organization. To delete the data you want export the existing data with ID’s and then by using this file we can delete the data. The data deleted by this operation will be available in recycle bin. If want delete data permanently choose hard delete option.
To delete data from object follow below mentioned activities
– Click on delete button and login with your org credentials.
– Select the object you want to remove the data. And select the csv files with record id’s you want remove.
– Map the ID field and then complete activity
Hard Delete
Hard delete means deleting the data permanently from the org. That mean data will not be stored recycle bin. To enable this button enable bulk API. To enable bulk API button go to data loader settings and then enable bulk API check box.